Watch this help video (5 minutes) for a full walkthrough of generating attendance records, making updates, sending and reviewing timecards. This daily process is the foundation for tracking absences, notifying supervisors when a student will miss work, and reviewing timecard submissions.
Taking Attendance
- Navigate to "Attendance by Date" in the CWSP Operations toolbar, and click "Add Work Group". You will be prompted to select a starting attendance status and work group. This training will walk through marking all Monday workers as present. We recommend beginning with 'Present' if you already have attendance taken and are just copying into Salesforce and 'Pending' if you are planning to check students in as you see them.
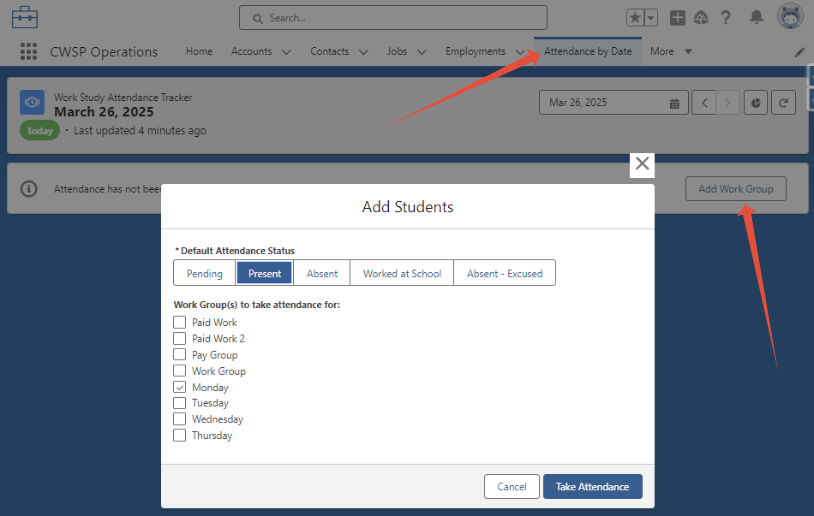
- When you have selected the status and work day, click Take Attendance to generate records! All students will show as present at this point.
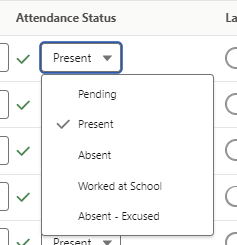
- Make changes to the following columns as needed:
- Job Location (Onsite or Remote On Campus)
- Attendance Status
- Late (for any students that are late)
- Uniform Violation (for any students out of uniform)
The following attendance statuses are available:
Present: The student is attending work as normal.
Absent: The student has missed work and will need to complete a make up day.
Worked at School: The student is unable to attend work for a reason outside of their control (a supervisor is out, there is company event, etc.) and are instead completing their work day at school.
Absent - Excused: The student is absent but will not be required to complete a make up day.
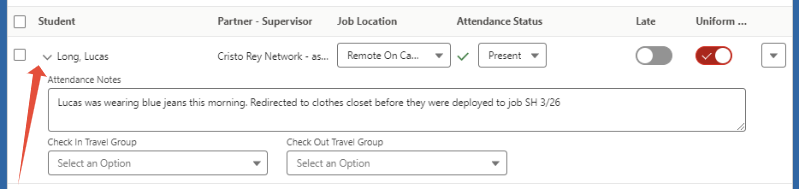
- Select the details dropdown to add notes and additional travel group information:
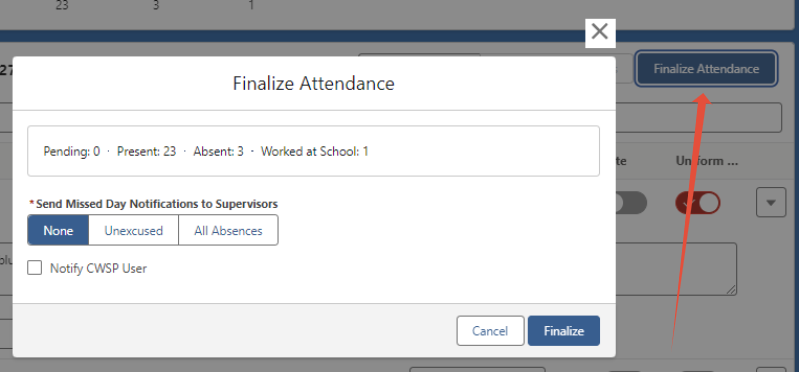
- Click the "Finalize Attendance" button. You will be prompted to make additional selections:
- Send Missed Day Notifications to Supervisors (checking this box sends an email to supervisors notifying them of absent student worker - choose all absences or only unexcused)
- Notify CWSP User (sends an email to a designated user selected in your school settings notifying them attendance has been finalized)
- Need to go back and make a change? Simply clicking "Edit Attendance" where Finalize Attendance was located will bring you back into the attendance flow. Update any editable column or dropdown as needed.
Sending Timecards
- Once you've generated attendance records using the "Take Attendance" work flow described in the first two bullets above, an automation is triggered to send out time cards at the chosen time in your school settings.
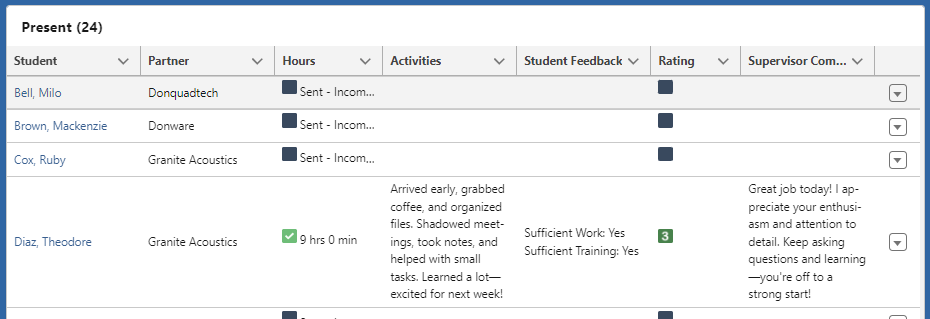
- An additional feature of the Attendance by Date screen is reviewing each days timecards upon submission by student and/or supervisor:
Was this article helpful?
That’s Great!
Thank you for your feedback
Sorry! We couldn't be helpful
Thank you for your feedback
Feedback sent
We appreciate your effort and will try to fix the article